Most of the videos and tutorials out on the web for using either the Babylock or the Brother 6-needle machines feature the newer models with the vertical LCD screen. I decided to put this out here showing where to find different functions on the older, horizontal screen found on the BMP6 (and earlier models).
This is just Part 1, so I cover turning on the machine up through uploading a design. Part 2 will cover editing designs and machine settings. Part 3 will cover stitching things out.
BEFORE STARTING THE MACHINE
Check to see if you have the USB stick loaded. One thing I've noticed on my machine is that if I have the USB stick loaded when I start up the machine, the machine won't recognize it as being loaded later. (Even if I take it out and put it back in.) This may be a quirk of my particular machine, but I always make sure it's not installed when I turn on the machine. |
| You may need to take out the USB stick BEFORE you turn on the machine for it to read it properly later. |
TURNING ON AND OILING THE MACHINE
 |
| This shows briefly whenever you turn on the BMP6. |
 |
| Oil the machine each day. You'll need to turn the dial on the back one quarter to reveal the ridge you need to oil. |
The oiling screen shows for half a minute before moving on to the main welcome screen. It'll warn you that the carriage will move and ask you to click OK before moving on. The hoop area will center once you click the OK button.
 |
| Then the welcome screen shows. They want you to press OK so you don't have the machine's arms move on you unexpectedly. |
 |
| You can start off where you last left off by selecting OK. Pick cancel if you want to start on something new. |
MENU OVERVIEW
This is the screen that shows when you don't have any patterns queued up to sew.
 |
| The Edit Screen when no patterns are loaded. |
Let's take a closer look at the different options for uploading a design to sew....
 |
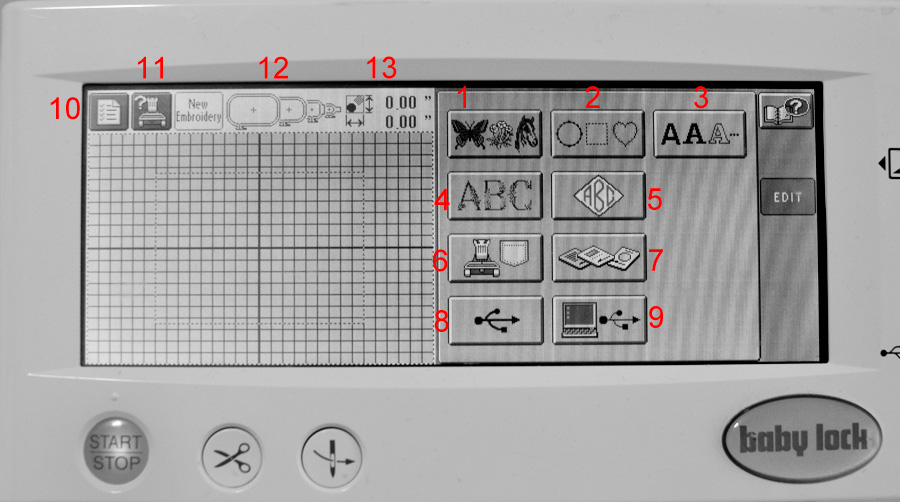
| The right hand of the screen is devoted to getting designs loaded into the machine. (Numbers 1-9). Numbers 10-13 are not related to loading designs into the machine, but I was lazy in Photoshop. I didn't want to edit multiple screenshots. |
I've loaded the screen in greyscale and placed letters in red to make it easier to see them. Let's go over the buttons.
1) Pre-Loaded Designs. These are mostly there for the benefit of the dealers to show off the capabilities of the machine. However, the last design loaded into this section is designed to help you set the tension of the machine. If you want to find out more about adjusting tension, there's a handy video on the topic on YouTube here: https://www.youtube.com/watch?v=hmN_hUw4DW0
2) Border Designs. I rarely use them, but there's a variety of styles available.
 |
| Several fonts come built into the BMP6. For more fonts, you need to use embroidery software and upload them using the USB connection. |
3) Fonts. The fonts that come pre-loaded in the machine are handy. Clicking on them will load up the different options. You can use the little hand icons to get to more pages/screens/options.
Once you pick a font, you can type in what you want. Each allows for a Large, Medium, and Small font size. HOWEVER, you want to pick Large, Medium, or Small as soon as you type a letter. If you type out the whole word and then want to change it, it'll only change the most recent letter. BTW, you can use the edit screen to bump the size up or down a little bit later, but it's recommended to get as close to the size you want as possible the first time.
 |
| The bottom tabs let you pick between upper case, lower case, symbols, and foreign characters. |
 |
| You want to pick Large, Medium, or Small (button circled in red) almost as soon as you start typing. |
Other options on the typing screen include ARRAY, which will let you place the letters on an arc or a slope, and CHECK, which may help you spell-check what you've typed. Click SET to confirm what you've typed in. You can only do one line of text at a time, so if you need a second line, you'll need to do Set the first line, then click Merge on the next screen to add in another line.
 |
| If you need to add another design (or another line of text), click on the MERGE button. |
Continuing on with our tour...
4) Floral Font. Honestly, I've never used the built-in floral letters, though I've heard that the designs are very pretty from others.
5) Monograms. I use this option quite a bit. It lets you make easy, diamond-shaped monograms in a couple of different sizes. Note, that's 3 different sizes, not styles. There's only one built-in monogram style (and frame).
6) The Pocket. The icon is designed to look like the machine and then a shirt pocket, but it's the machine's built-in storage. If you go to a show and are only running a few select designs, this is the way to go because you don't have to worry about a USB stick getting pulled out/lost/bent/etc. There isn't much room in the pocket, but it can be handy if you're travelling.
7) Design Cards. If you've bought the fancy design cards (sometimes used by the Pallet Embroidery Software package), this is how you tell the machine to go look for them. I'm willing to wager that most people won't ever use this button on their machine. (I haven't.)
8) USB Stick. This little button tells the machine to check the USB port for a removable storage card. This is how I load almost all of my designs into my machine. Click on it and it'll bring up a list of what's on the card, so you can pick a design to load up into the machine.
9) USB Link to Computer. Lots of people use this option to let their computer talk right to their machine. I've even heard of people that have managed to hook up a wireless gizmo into the BMP that allows it to connect to their computer without the hassle of stringing a cord between the two. (It's currently on my to-do list, but I haven't gotten around to it yet.)
10) Settings. You can adjust quite a few things in here, but you generally don't need to access it too often. There's a handy screen to tell your machine which colors you have loaded where in here, but I'll go over that later.

11) How To Section. This area is full of little diagrams showing how to do things, like change a needle, oil the machine, thread the machine, etc. Newer models (with the vertical high-def screen) have videos, but the older models just have diagrams and text. It's still handy if, say, you need to know how to hook up the cap frame driver or something.
12) Hoop Size. The machine automatically recognizes 4 standard hoop sizes:
- Large (300 x 200mm) - 11.8 x 7.9 inches
- Medium (180 x 130mm) - 7.1 x 5.1 inches
- Small (100 x 100mm) - 3.9 x 3.9 inches
- Extra-small (60 x 40mm) - 2.4 x 1.6 inches

Once you load a design, the machine will show which hoops are capable of holding it. For example, the small and extra-small hoops are faded out in this screenshot showing the word 'Polkadot'.
Oh, and since I'm talking about hoops... if you ever need more hoops, check out ebay seller CleverDelights. He has them at a really, reasonable price because additional hoops can get really pricey very quickly.
There are a number of 3rd party vendors who have developed hoops that will fit onto the Brother and Babylock 6-needle machines. These are called 'after-market hoops'. You can use them, but the machine isn't automatically programmed to recognize them.
13) Design Size. This section shows the size of the uploaded designs. If nothing is loaded, you'll see 0.00", for example. If you have multiple designs loaded onto the machine, it'll give the dimensions of the overall sewing area (handy if you want the designs to fit within a certain area.
UPLOADING DESIGNS
I upload most of my designs off of a USB device (option 8 above). I've found that my BMP6 uploads them more quickly and efficiently when the USB storage device is relatively small. (It's so much faster that I've resorted to buying a dozen 500MB drives from Hong Kong via ebay. It was about $20 for all of them, but I considered it worth it for the amount of time I save waiting for designs to load.) The newer models were produced when larger USB drives were more common, so I don't believe they are so slow when accessing files on large drives.
Once the machine reads your USB drive, you should see something like this:

If you have designs organized into folders, you will see folders as well as designs. If you look carefully on the above photo, you'll see that I'm already in a folder called ANIMALS. (The BMP6 always displays file and folder names in CAPS.) The circled section is over three different files - two of which appear as photos.
Why are some files displayed as photos while others are displayed as file names?
Because of the file format. If your files are saved in the *.pes file format, then you will see little pictures. If your files are saved in the *.dst format, then you will see file names.
What is the difference between *.pes and *.dst file formats?
The *.pes format stores color information along in the file, which can save you time programming in the machine (particularly if there are a lot of colors in the design or, especially, if the design switches between 2 or 3 different colors repeatedly). The color information isn't absolutely perfect, however. The *.pes format only uses 64 standard colors, so it'll try to fit the colors of a design into those 64 shades. This can result in an error or a color that doesn't make a lot of sense - particularly if the design uses several shades that are close to each other. (For example, I've seen designs using 3 different shades of red, that end up having one of them saved as pink, orange, or brown in order to make them easier to distinguish in the *.pes format.)
The *.dst file format is colorless - you will need to tell the BMP6 which color goes to which color change. This takes more time, but it can also guarantees that you've reviewed the color changes so you don't end up with some unexpected error. Since the format doesn't bother trying to store color information, the file ends up having room for more trim data. (The number of trims you can have saved into a design is greater with the *.dst format than with the *.pes format.)
What format do I use?
I generally use the *.dst format because I like working with file names on the screen. (I have a lot of designs were there are 3 different sizes of the same general design.) Also, I tend to use my own color schemes for designs, so I'm often changing the colors manually anyway. I will use the *.pes format if the design would be a pain to program, however. For example, if I'm stitching a font that uses the same 3 colors for each letter.
Once you select a design, a preview of it will appear on the left side of the screen:

Pick SET (lower right corner) to finalize your selection. Unfortunately, you can't select multiple files at once. You if you need two (or more files), you'll need to merge them in once this one is loaded.
 Also note: the hand icons will let you browse more designs. The folder up button will let you get out of a given folder.
The button above the big, round SET button (looks like a hoop with 3 stripes of color) will let you preview the design more closely (see screenshot at right). This same button appears in several screens on the machine.
The far left side of the screen also has a 'DELETE FILE' button. Using this button will delete it from your USB stick. Please note that in other places on the machine, you will see simply 'DELETE' rather than 'DELETE FILE'. If it just says 'DELETE', it tells the machine to stop using the file - it'll still be safe and sound on your USB stick. If you're done with a given project and need to start stitching a different pattern, you can use the Delete button to clear out the patterns programmed into the machine.
 |
| Note the difference between 'DELETE' and 'DELETE FILE'. |
Thanks for posting this!
ReplyDeleteThanks for posting this!
ReplyDeleteI am glad to hear that it's been useful for you!
DeleteIs there a way to put the needle down before you start to verify that you are exactly center? I'm new to this machine.
ReplyDeleteSome options:
ReplyDelete1) Use the clear templates that work with the standard hoops to figure out where the center of the hoop is and how far you might need to nudge the design in order to have it stitch at the center.
2) You can press start and then trim and it'll sew a small trim directly beneath the needle. You can only do this on the sew screen.
3) You can technically manually pull down the needle mechanism/foot to get a much clearer idea of where the needle will pierce. (The needle itself does not penetrate the fabric.) It's not the recommended method to check because you're moving the machine yourself rather than with built-in features, but I've done it. (Especially on hats when I'm using the cap frame and the templates aren't much use.)
where is the other parts to look at this is great
ReplyDeleteHi, I was just wondering if you ever published Part 2 and Part 3 of this article? It has been very informative and well written. I am looking at purchasing a BMP6 and need all the information that I can get.
ReplyDeleteHi, I know there is a way to see how long a BMP6 has run, but I am not able to find it. Could you please help me with this?
ReplyDeleteThanks
Reading this makes me feel a lot better purchasing the BabyLock BMP6. Thanks for the good information
ReplyDeleteWhat is wrong when the needles will not move at all?
ReplyDeleteThis is really meaningful article has posted by you and it is really helping out for increasing knowledge on concern department. Professional embroidery digitising service is now available in reasonable cost by using our service.
ReplyDeleteI just bought a bmp6 baby lock used and I wanted to know if I can use the embrilliance for this machine. Thanks in advance
ReplyDeleteHow much did you pay for the bmp6 babylock? I was wondering because of how old the machine is?
DeleteI'm Абрам Александр a businessman who was able to revive his dying lumbering business through the help of a God sent lender known as Benjamin Lee the Loan Consultant. Am resident at Yekaterinburg Екатеринбург. Well are you trying to start a business, settle your debt, expand your existing one, need money to purchase supplies. Have you been having problem trying to secure a Good Credit Facility, I want you to know that Mr Benjamin will see you through. Is the right place for you to resolve all your financial problem because am a living testimony and i can't just keep this to myself when others are looking for a way to be financially lifted.. I want you all to contact this God sent lender using the details as stated in other to be a partaker of this great opportunity Email: 247officedept@gmail.com Or WhatsApp/Text +1-989-394-3740.
ReplyDeleteI would like to thank you for the efforts you have made in writing this article. I am hoping the same best work from you in the future as well. Thanks... Your Domain Name
ReplyDeleteWell, the article is actually the sweetest on this notable topic. I harmonise with your conclusions and also will thirstily look forward to your next updates. Saying thanks definitely will not simply just be enough, for the extraordinary lucidity in your writing. I can directly grab your rss feed to stay abreast of any updates. Solid work and much success in your business efforts! Startup Business Consultant India
ReplyDelete