
There are lots of different image editors available. I personally work with Adobe Photoshop CS 5. However, there is a program called GIMP that can do almost everything that Photoshop can, and it's available for free via gimp.org, so I'm going to use it for this tutorial. (By the way, the biggest difference that I've found between the two programs is that Photoshop allows for macros and batch processing, which most Photoshop users don't even know how to use.)
I like these two programs because they allow you a lot of flexibility for fixing things. Sometimes with other programs, if you go too far, you can't undo a certain change. I'm going to show you a method that'll let you make changes later if you need to without starting all over again. Also, the program's flexibility means that you don't really need to complete the steps in the exact order that I give. I'm just going to list them in the order that I generally do them.
Original Source Photo
 |
| Bag originally embroidered by special request for a client. The tote features my own exclusive embroidery design. |
Step 1: Adjust for Contrast and Brightness
 |
Various image adjustments are
found on the Colors menu.
|
Why do I do this first? Because sometimes after you adjust for contrast and brightness, you discover that you don't really need to do anything else. In Photoshop, I use an adjustment mask, which you can go back and tweak later. Gimp doesn't have that feature, so I don't take contrast, brightness, or saturation too far right away because sometimes your object looks a bit different once you add the white background. Usually I make a small adjustment first, then do a second adjustment later to fine-tune things.
In order to adjust brightness and contrast in GIMP, you go to the various options under the Color menu. The menu is arranged so the tools that use sliders are at the top. For example, I could adjust the image using the contrast/brightness sliders to look like the image below:
 |
Using the Brightness-Contrast Adjustment
|
One tool that I use a lot is Levels. It shows a histogram of how much black is in the image, how much white is in the image, and everything in between. Moving the little arrows at the bottom of the histogram in to where the hills start will allow you to improve the contrast without over- or under-exposing the image.
 |
Adjusting contrast using Levels
|
Move the left (black) arrow in to change the black point. Move the right (white) arrow in to change the white point. Move the middle (grey) arrow around to adjust the midtones.
Step 2: Select Your Background
In advanced image editors, you can tell the computer to only make changes to certain parts of the image. In Photoshop and GIMP, the area that you can work with is bounded by a line of black and white 'marching ants'. You can adjust the selected area by filling it with a color, adding a gradient, making contrast or brightness adjustments, etc. Furthermore, you can turn selections into masks, allowing you to adjust certain areas 100%, other areas 50%, and still other areas 0%. (This can, be quite handy if you need to adjust for inconsistent lighting - say if the flash makes some areas more exposed than others. But that's a topic for another time.)
There a number of tools available for making selections. I like some better than others. Here are the ones that I find most useful:
 |
The fuzzy select tool looks like a magic wand.
|
Fuzzy Select - click on an area, and it'll select all adjoining areas that are about the same color and value. You can adjust the sensitivity of what's considered the same color. You can also press SHIFT or the ALT button to either add to the selection or remove areas from it.
 |
Gimp calls it 'free select tool', but it looks like a lasso.
|
Lasso - this allows you to draw a selection free-hand. You can click individual points and the program will create a straight line between them. (This is not automatic in Photoshop - you have to use the polygonal lasso for that.) Close the selection by either clicking back on the first point or by doing a quick double-click. Again, you can press SHIFT to add to the selection or CTRL to subtract from the selection. (You use ALT to subtract in Photoshop.)
 |
Select by color tool.
|
Select by Color - this is an option that'll select a certain color regardless of where you find it in the image. It has it's own button in Gimp. In Photoshop, you find through it through the menus: Select -> Color Range. Again, you can use SHIFT or CTRL to add or subtract.
 |
You can get to quick mask using the menu.
You can also click Shift + Q.
|
Quick Mask - this is something that you'll only find in Photoshop and GIMP, and once you know how to use it, you may have have trouble bringing yourself to use anything else. Basically, it lets you create a selection by painting. The reason why I like it is because it allows you to easily feather selections (feathering refers to creating a soft-edge). You use any size or type brush that you like to create a selection, and the color of the brush (from white to black) dictates how much the computer will adjust things in the selection:
- If a mask area is 100% white, area is 100% selected/editable (area will not have a red overlay)
- If a mask area is 100% black, area is 100% NOT selected (masked - will show with a red overlay)
- If a mask area is 50% grey, area is 50% selected (the area will have show a weaker overlay of red)
- And so forth....
Areas that are masked out (edits won't apply) will have a red overlay to make it easier for you to see which pixels you are defining as masked. Click SHIFT + Q to get in an out of Quick Mask (in Photoshop, you can just click Q).
You can use whichever tool(s) you want to get a good selection. Sometimes it's easier to select the object itself. Sometimes it's easier to select the background and then invert the mask later. In this case I'm going to eventually invert the mask.
Making the Selection Using Quick Mask
Toggle Quick Mask On. You can click SHIFT + Q to get there, or you can use the menu Select -> Toggle Quick Mask. (BTW, don't click CTRL + Q - that'll quit the program.)
 |
Image now in quick mask mode. Everything is masked.
If I exit quick mask now, I won't have a defined selection.
|
 |
Use the brush pallet
to select different
brushes.
|
Your photo will now be covered in a reddish layer. That means that everything is masked out (not selected).
Select a Brush and start painting over your item using PURE WHITE as the brush color. I usually zoom in to 200% or more while I'm doing this. (If you look at the lower left hand corner below your image, you'll see what you're zoom level is. You can pick one of the pre-sets there, or type in something.) If you're zoomed in, you can use the horizontal and vertical sliders to see more of the image, or you can save time by holding down the space bar button and dragging. Once you let go of the space bar button, you'll go back to whichever tool you were using.
 |
Clicking shift will allow you to paint a straight line between points.
I can also change the size of the brush using [bracket] buttons.
|
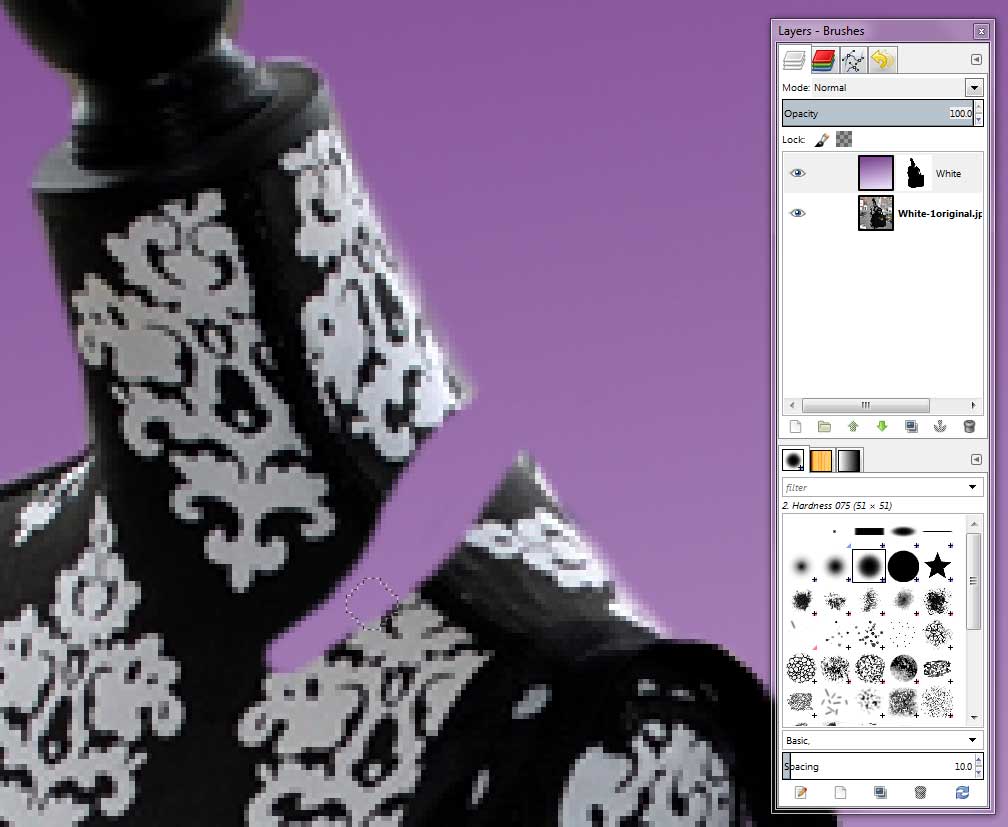
For painting selections, I like to use the 75% hardness brush because it gives me a slightly feathered edge. If you click once with the brush, and then hold down shift when you go to click in a new spot, the program will paint a straight line. I use this to outline the inside of my object without having to worry about having a jittery hand. You can also change the size of the brush as you work by clicking on the [bracket] buttons. The [ left bracket will make the brush smaller. The ] right bracket will make the brush bigger.
 |
I've defined most of the outline
of my object. The next step
will be to fill it with more
white, giving me a nicely
defined dress form and bag.
|
Once you've defined your outline, you'll want to fill in the area. You can use a white brush again, or you can save time by clicking with the fill tool (again, set the color to white). From there, you can clean up any stray pixels.
A Note About Combining Tools
Now, you may be wondering, if I'm just making a selection by clicking and connecting the spots between the clicks using the SHIFT button, why is this any different than using the polygonal lasso? Well, it's not all that much different. The thing is, using a brush in quick mask gives me a more gentle curve because the brush is round while a polygonal lasso creates sharp points. Depending on what you're doing, one might be better than the other. For example, I don't want a pointy bust on this dress form - that's just not very attractive. I may want a crisp corner on the bag's top edge, however. If I am editing a photo of jewelry with lots of perfectly round beads, I definitely want to use quick mask because I can set the brush size to be the same size as the beads - then I only have to click on each bead once to get a perfectly round edge around each one.
 |
I've used the lasso tool to
make sure I can only paint
within the outline I defined
earlier. The goal is to have
no red overlay on the product.
|
I can still use a polygonal lasso in quick mask to get sharp corners.
Here, I've made an outline, I've filled it with the bucket tool, and I'm in the process of cleaning up stray pixels to remove the mask (red overlay) from the entire dress form and bag. If you look really closely, you'll notice that I'm even using the lasso tool to make the painting job go faster. I can disable the lasso selection by going to Select -> None before I move onto the straps.
 |
Swap foreground and background colors
using the swap button. Or just press X.
|
Working on the Straps
Now those straps have some areas that are TINY. If I use the brush, I may get a thicker selection line than I want.
One of the advantages of Quick Mask is that I can toggle between painting black and white to get EXACTLY what I want. (You can toggle between your foreground and background colors easily by clicking X. Or you can click the swap button.) I'm going to use the lasso tool to help make sure I have just the right areas masked.
 |
Step-by-step for getting a good selection on those little straps.
Left image - The circle shows the brush outline, the crosshair is where I'm using a shift-click to paint a perfectly straight line between two points (shown as a straight line). Not that this doesn't capture the right outlines of the strap.
Center image - shows a lasso selection within quick mask. I'm telling it to only let me make changes to strap area of the image, so I can paint without having to worry about the areas I've already worked on.
Right image - finished selection uses a brush tool within a lassoed area.
|
Now I could toggle between black and white while I'm painting until I get things just right. In this case, I just made a quick lasso selection and then painted.
Step 3: Once You Have Your Selection, Add a Layer Mask on a New Layer
Here's my final selection - still in quick mask. I'm togging to get out of quick mask to go back to those little marching ants we all know and love.
 |
This shows my final selection before exiting quick mask.
I can do that by going to Select -> Toggle Quick Mask.
|
From there, I could go right over to the little paint bucket and fill this selection with color. This is what most people do, but the program allows me to do something a bit more flexible. I'm going to create a new layer, apply a layer mask, and then fill. Doing this will allow me to make changes easily later. This next part may seem a bit confusing, so please, just follow the steps and you'll see how it works once we're done.
 |
To make a new layer, go to the layer pallet. The new layer
icon looks like a little sheet of paper. Clicking on it
will bring up a dialog box.
|
1. Make a New Layer. Go to the layers dialog and click on 'new layer' (looks like a little piece of paper). It'll bring up a little screen asking you how big you want the layer to be, what you want to call it, and what color you'd like it to be. I'm keeping the default size (the same size as my total image), I'm calling it White, and I'm setting the color to white. The end result gives me this:
 |
The new layer filled with white shows up in the layers pallet
above the background image. I still have an active selection.
|
I still have the selection, and the original image - it's just that a white layer is covering everything up. (Think of it as like a white piece of paper sitting on top of your original image. The selection is going to act like a die cut line allowing us to cut through that paper to see your image underneath.) If you look at the layers pallet, you'll see a little thumbnail of your original image underneath a little thumbnail of pure white. These are your two layers. Think of them as sheets of transparencies sitting on top of each other in a stack. You'll want to pay attention to which layer is highlighted when you make changes now that you have more than one layer you can edit.
Now. The white layer is highlighted, so that's what I'm editing. If I clicked delete, I would delete some of the top white layer, allowing me to see what's underneath. Since we've still got a selection from the quick mask, only the area right above our product would be deleted. However, I'm NOT going to click delete right now because going through one simple extra step will give me a more versatile file to work with later (one that'll let me easily swap the white you see below with another color or even another image).

2. Add a Layer Mask. Right click on the white layer in the layers dialog and select 'Add Layer Mask'. A little menu will come up - pick initialize mask to 'selection' and click the check box for 'Invert Mask'. Then click 'Add'. It'll give you an image that looks like the same thing above, but it's better. (Trust me).
 |
Right click on the layer to add a layer mask.
|
 |
Tell it to use your selection to define the mask.
If it comes out having white in the wrong spot,
click 'invert mask' on this menu. You can invert
the mask later by selecting the mask
thumbnail and then using Colors -> Invert.
|
You can now safely go to Select - None. This will get rid of the marching ants. From here, you can save the image - more on that later. But first, let me explain why I bothered with this second step.
Why is using a Layer Mask Better?
Flexibility. It's a lot easier to edit if you need to make changes later. If I had simply painted or deleted things, it might be really hard to make changes or get back parts of the original image without having to undo and then redo a lot of steps. (Which may not be possible if you need to save the file and come back to it later.)
I can also make DRASTIC changes to the top layer without messing up my selection - effectively letting me change the background of this image at will. If you look at the layers pallet, you'll see the background, the white layer, and the mask. If I click on the white thumbnail, I can tweak the content of the layer to be anything I want it to be. For example, I'm going to apply a gradient:
 |
Layers Pallet. The layer mask
doesn't have a black border
around it right now, so that's
what the program is
currently working with.
|
 |
If I select the white thumbnail, I can make changes to the
top layer's color and content. In this case, I added a gradient.
|
Do you see how I didn't mess up anything related to object itself? I can go back and change the gradient again if I don't like the colors or direction:
 |
By editing the top layer's content, I can create
whatever 'background' I'd like for this product.
|
Now if you've ever tried to use a fill tool or gradient tool without using a selection, you'll recognize that changing things like this is kind of tricky. Now let's say that I want to go back to a plain-colored background (white). I could try clicking repeatedly with the fill/bucket tool, but it might give me funky results.
 |
If I were only working off of a selection,
rather than a layer mask, I might get
something like this if I decided I wanted
to change the gradient background later.
|
Instead, I can merely click Select -> All from the menu. Then I can delete it all and fill it with white using the bucket tool.
 |
This is showing the undo pallet.
You can see the steps I took to get
rid of that gradient. (Select all,
delete, then fill with white.)
|
As long as I'm not messing with the mask, I can make whatever changes I want to the layer white and I don't have to worry about having anything spill over onto my product. I can adjust the mask separately too if I need to as well.
Changing the Layer Mask
 |
Layers pallet with the top
layer filled with a purple gradient.
The layer mask is shown in black
and white next to it. My original
image is on the bottom layer.
|
If you look very closely, you'll notice an extra bit of white near the neck. Well, you can fix it pretty easily. I'm going to go to a purple gradient background again, just to make it easier to see what I'm doing.
Look at the layer's pallet. You'll see a layer at the bottom with the original image, on a line above that there are two thumbnails. One shows the the content for the layer 'White' (a purple to white gradient at the moment), and you'll see a black and white thumbnail next to it for the mask. If I select the mask, I can paint on the mask using black and white brushes to adjust it - just like in quick mask. (Note: a black border around the thumbnail means is used to indicate what you are NOT working on at the moment. If you're working on the layer mask, then it won't have a border.)
Painting with black masks out more areas of the gradient (allowing the background layer to show through). Painting with white allows more areas of the gradient to appear on the layer.
 |
Painting with white on the layer mask shows
less of what's underneath the top layer.
|
 |
Painting with black on the layer mask shows
more of what's underneath the top layer.
|
Now that I'm looking at the image with a gradient, I realize that white halo I saw was actually from some of the background behind the dress form. I just painted with white to on the mask to adjust things. I can zoom in and glance around the image to make sure I've got everything to my satisfaction.
For example, one thing I don't have is the pole underneath the form. I can easily put that in. But where is it? Well here's a trick: reduce the opacity of the top layer.
 |
You can adjust the opacity of individual layers.
|
Now I can see some of what's underneath the layer, and I can adjust my painting on the layer mask accordingly. Once the pole is painted in, I can move that opacity back up to 100% (and make the background white).
 |
The opacity of the gradient layer is currently set to about 50%.
|
Optional Step 4: Resize, Crop, and/or Add a Watermark
 |
If you add text, it'll show up bounded by a dashed border
rimmed in yellow. This border shows up on the edge of
whichever layer is currently selected.
|
I used a small 500 pixel-high image for this tutorial. However, when I work on my own images, I usually work on them at the size I get them out of the camera, which is much, much larger. I wait until the very end to resize, crop, or add a text layer as a watermark.
I could easily write a blog post with step-by-step images for each of these things. So here's the quick version...
- You can Crop using the Crop Tool.
- You can resize by going to Image -> Scale Image.
- To add a watermark: add text, then reduce the opacity of the text layer.
 |
The crop tool looks like and Exacto knife.
|
It's common for me to crop in to show important details. I may get 5 useful images for the web off of one large image. You can use the undo pallet to get back to the original size (or save it in the *.xcf format first, then export your cropped images as *.jpg images).
Step 5: Saving Your Work
 |
If you click save in GIMP, it'll use the *.xcf format.
|
If you save your image in GIMP, Gimp will save it in it's own format (*.xcf), which preserves your layers, masks, opacity settings, text blocks, etc. so you can go back and change things at a later date. (This is great if you're like me and you're willing to edit or create images for others. Or if you're adding text that you might want to move or change later - like a shop banner.)
 |
If you want to save in *.jpg, use "Export.."
|
If you want to save your image in another format (*.jpg, *.png, *.gift), then you need to go to File -> Export. The export screen seems to use the *.png format as a default. If you want something else, you can just type it in or you can click on the little +/- toggle button down at the bottom to select by file type.
 |
You can change the file format from *.png to *.jpg by
typing it in on the file name bar, or by going to the file type
option near the bottom of the export screen.
|
From there, you'll get a menu where you can adjust the image quality.
 |
Once you pick a file name and type, it'll let you
specify the image quality.
|
Click 'Export' and you're done. Here's the final image:
 |
All Done! Bag is available for sale in my shop.
|
Needless to say, it's just easier to take a photo with a white background in the first place. For an easy way to do that, check out my entry on Getting a White Background, part 1: photography.
Excellent word about product photo editing. thanks, check out our clipping path idea
ReplyDeleteThis article gives the light in which we can observe the reality. This is very nice one and gives indepth information. Thanks for this nice article. Produktfotografie
ReplyDeleteThis product photography editing process is very good, thanks a lot for this good idea.
ReplyDeleteBest Photo Editing Company